The sprites used in this post come from existing games and are used here only for learning purpose.
Build the structure
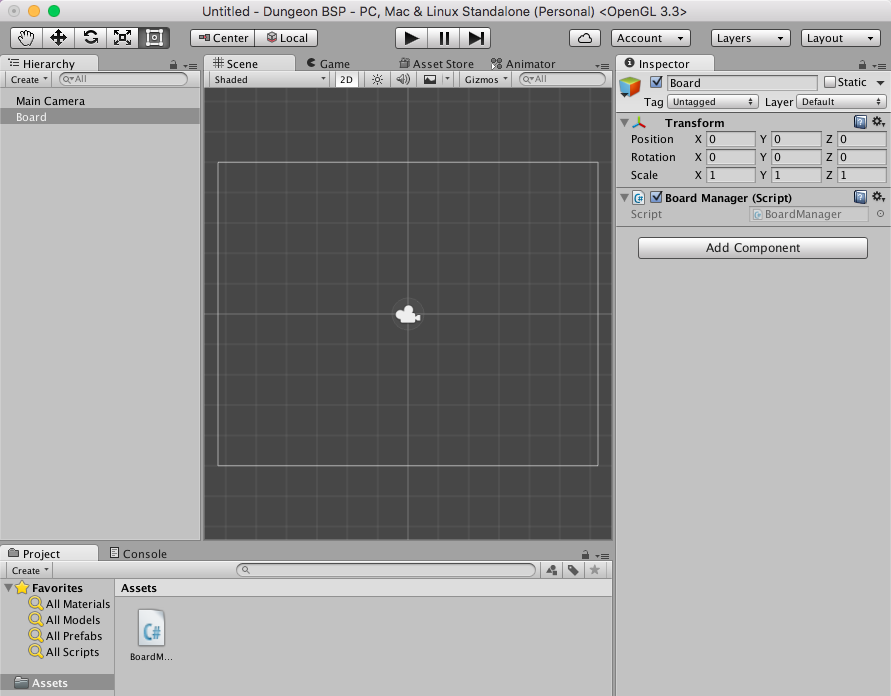
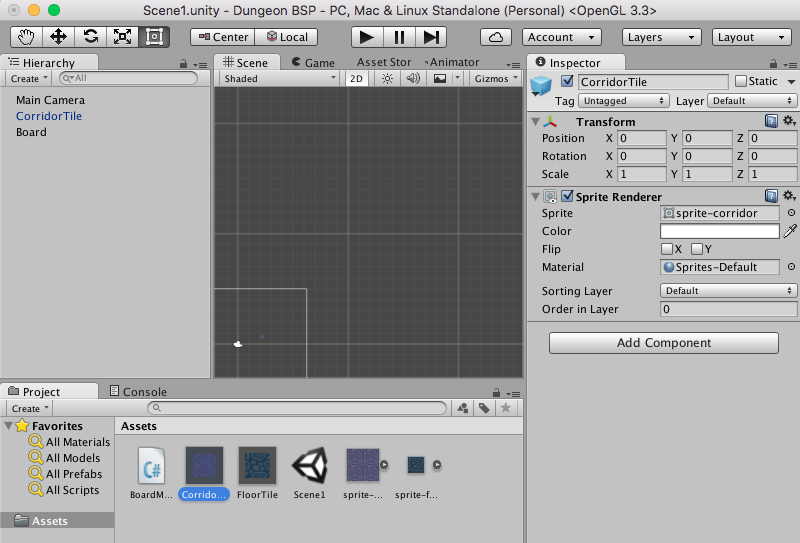
Let’s start with a new 2D project in Unity 5. Create a new Game Object called Board for holding the whole dungeon. On this game object create a new Script component called BoardManager. We’ll code the dungeon generation logic into it.
I recommend you refer to the stackexchange answer above for the illustrations of the following steps.
The idea of the algorithm is to start with a rectangular cell representing the whole dungeon. Then we’ll split this dungeon in two sub-dungeons, with a randomly chosen splitting position. The process will be repeated again for each sub-dungeons recursively, until the sub-dungeons are approximately the desired size of a room.
publicclassBoardManager:MonoBehaviour{publicintboardRows,boardColumns;publicintminRoomSize,maxRoomSize;publicclassSubDungeon{publicSubDungeonleft,right;publicRectrect;publicRectroom=newRect(-1,-1,0,0);// i.e nullpublicintdebugId;privatestaticintdebugCounter=0;publicSubDungeon(Rectmrect){rect=mrect;debugId=debugCounter;debugCounter++;}publicboolIAmLeaf(){returnleft==null&&right==null;}publicboolSplit(intminRoomSize,intmaxRoomSize){if(!IAmLeaf()){returnfalse;}// choose a vertical or horizontal split depending on the proportions// i.e. if too wide split vertically, or too long horizontally,// or if nearly square choose vertical or horizontal at randomboolsplitH;if(rect.width/rect.height>=1.25){splitH=false;}elseif(rect.height/rect.width>=1.25){splitH=true;}else{splitH=Random.Range(0.0f,1.0f)>0.5;}if(Mathf.Min(rect.height,rect.width)/2<minRoomSize){Debug.Log("Sub-dungeon "+debugId+" will be a leaf");returnfalse;}if(splitH){// split so that the resulting sub-dungeons widths are not too small// (since we are splitting horizontally)intsplit=Random.Range(minRoomSize,(int)(rect.width-minRoomSize));left=newSubDungeon(newRect(rect.x,rect.y,rect.width,split));right=newSubDungeon(newRect(rect.x,rect.y+split,rect.width,rect.height-split));}else{intsplit=Random.Range(minRoomSize,(int)(rect.height-minRoomSize));left=newSubDungeon(newRect(rect.x,rect.y,split,rect.height));right=newSubDungeon(newRect(rect.x+split,rect.y,rect.width-split,rect.height));}returntrue;}}publicvoidCreateBSP(SubDungeonsubDungeon){Debug.Log("Splitting sub-dungeon "+subDungeon.debugId+": "+subDungeon.rect);if(subDungeon.IAmLeaf()){// if the sub-dungeon is too largeif(subDungeon.rect.width>maxRoomSize||subDungeon.rect.height>maxRoomSize||Random.Range(0.0f,1.0f)>0.25){if(subDungeon.Split(minRoomSize,maxRoomSize)){Debug.Log("Splitted sub-dungeon "+subDungeon.debugId+" in "+subDungeon.left.debugId+": "+subDungeon.left.rect+", "+subDungeon.right.debugId+": "+subDungeon.right.rect);CreateBSP(subDungeon.left);CreateBSP(subDungeon.right);}}}}voidStart(){SubDungeonrootSubDungeon=newSubDungeon(newRect(0,0,boardRows,boardColumns));CreateBSP(rootSubDungeon);}}
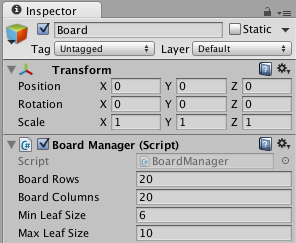
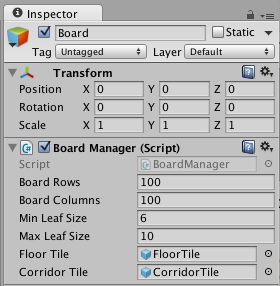
Then set the public variables for board and rooms size in the Unity editor.
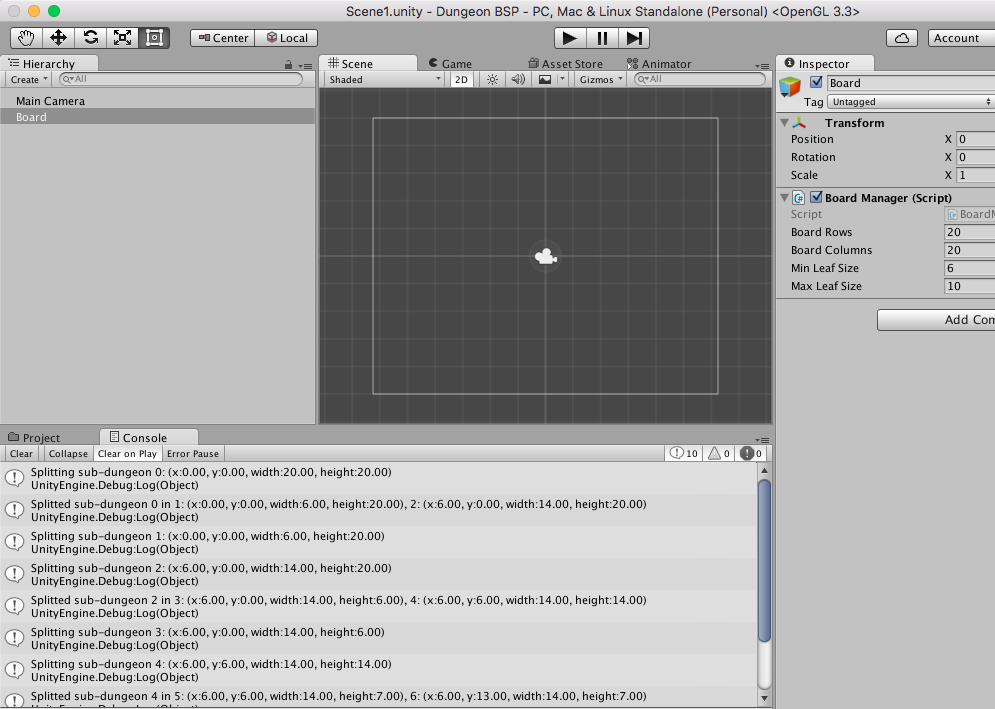
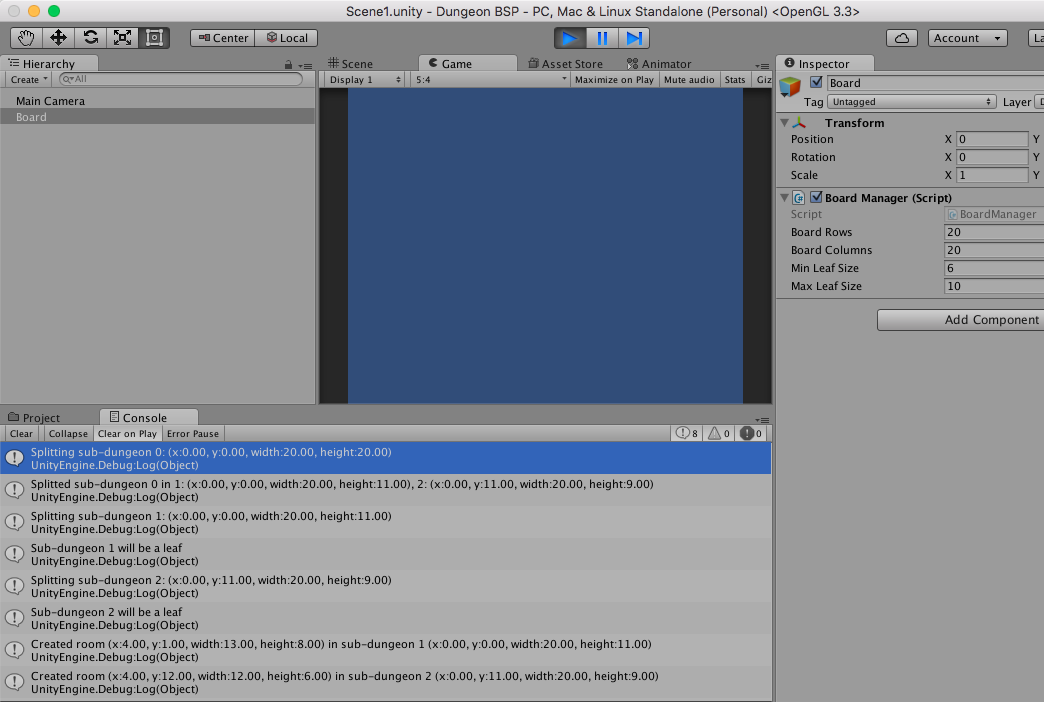
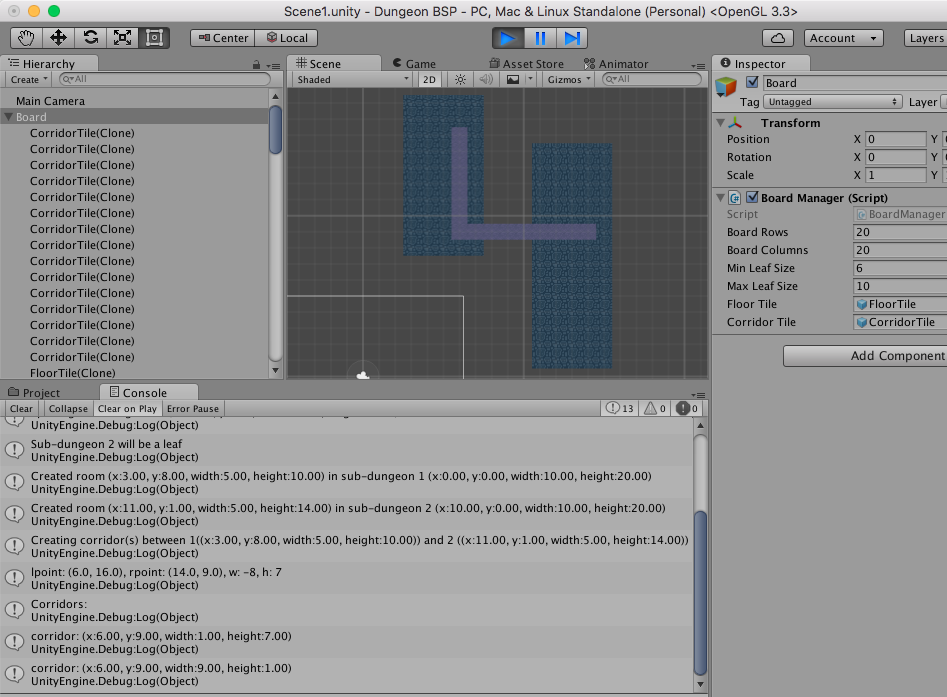
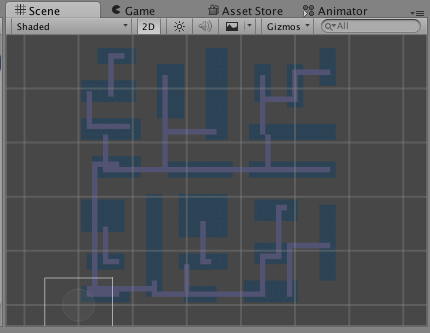
When launching the game you should have something like this in the console :
Create the rooms
We now have a tree structure with the leaves corresponding to the smallest sub-dungeons. In each of these leaves we’ll now create a room with a random size.
Add the following variable and method to the SubDungeon class :
1234567891011121314151617181920212223
publicclassSubDungeon{//...publicRectroom=newRect(-1,-1,0,0);// i.e null//...publicvoidCreateRoom(){if(left!=null){left.CreateRoom();}if(right!=null){right.CreateRoom();}if(IAmLeaf()){introomWidth=(int)Random.Range(rect.width/2,rect.width-2);introomHeight=(int)Random.Range(rect.height/2,rect.height-2);introomX=(int)Random.Range(1,rect.width-roomWidth-1);introomY=(int)Random.Range(1,rect.height-roomHeight-1);// room position will be absolute in the board, not relative to the sub-dungeonroom=newRect(rect.x+roomX,rect.y+roomY,roomWidth,roomHeight);Debug.Log("Created room "+room+" in sub-dungeon "+debugId+" "+rect);}}//...
Instead of relying on console output, it would be more intuitive to start having a visual representation. First thing is to add a sprite for the floor of the rooms. You can use this one and add it as an asset in your project.
Also be careful to set the Pixels Per Unit to exactly the size of the sprite (16 for this sprite), so that the sprite will cover exactly a square in the board.
Next create a Prefab with this sprite (drag and drop it on the scene screen, then drag and drop back the object in the assets):
In the script we’ll need to add a public GameObject variable to hold this prefab:
Then in the editor drag and drop the prefab to set it.
Drawing the rooms 2/2: write the code
Back in the script we add a method to draw the rooms. Also as we draw the rooms, we’ll register the drawed squares in a variable representing the board called boardPositionsFloor. This variable is not really useful at first but will be essential when starting to construct a game above.
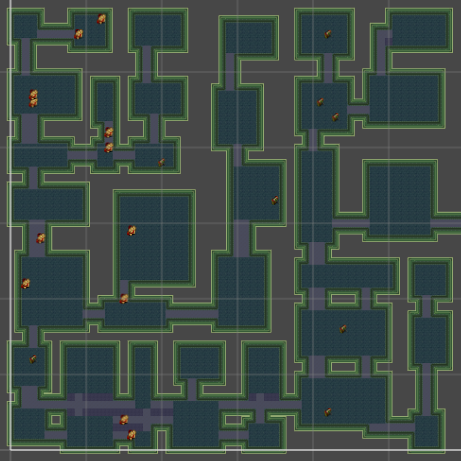
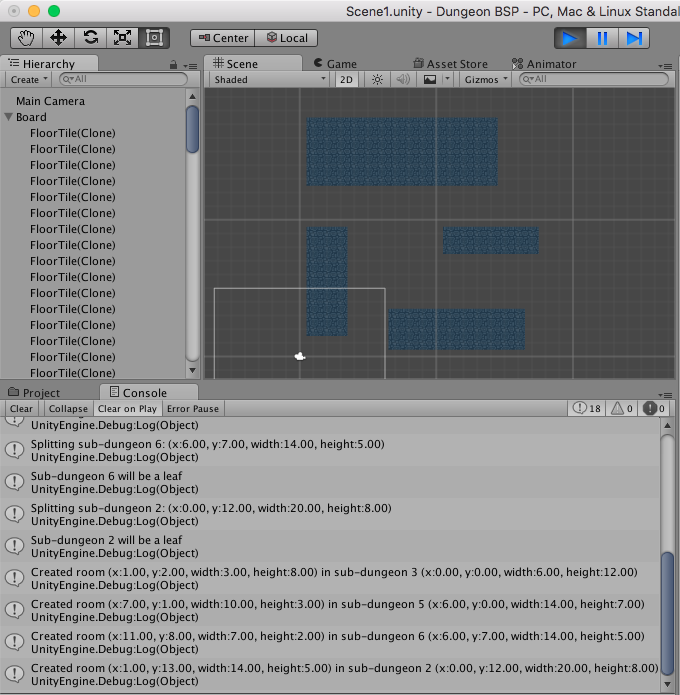
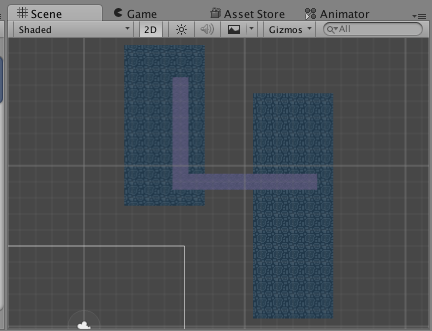
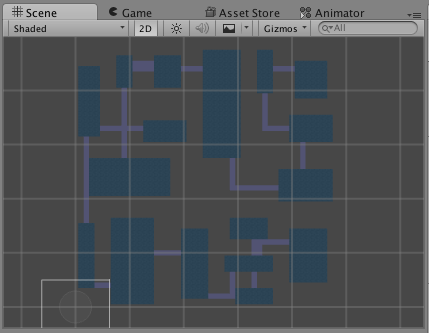
You should get something like this in the scene view :
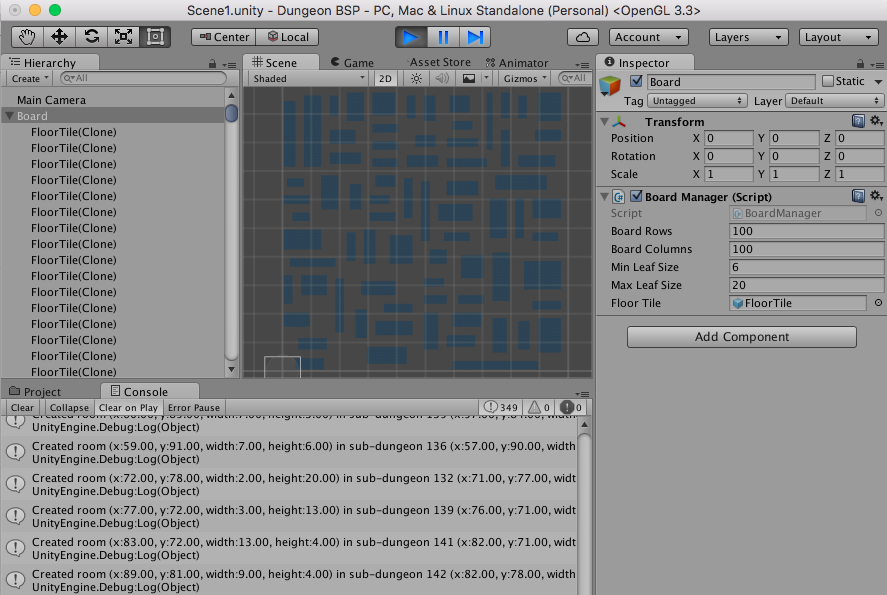
Now that we have a visual feedback, it’s also easier to play with the parameters :
Connect the rooms: create corridors between rooms
Isolated rooms are not very useful, so we’ll add corridors between them. To do so, we’ll connect each leaf to its sibling. Then going up one level in the tree, we’ll repeat the process to connect parents sub-dungeons, until finally we connect the two initial sub-dungeons (see the stackexchange answer for illustrations).
Add using System.Collections.Generic; at the beginning of the script, then in the SubDungeon class add:
We’ll also need a method to get the room of a sub-dungeon. If the sub-dungeon is not a leaf (i.e. doesn’t contain a room), the method will return the room of a child.
12345678910111213141516171819202122
publicclassSubDungeon{//...publicRectGetRoom(){if(IAmLeaf()){returnroom;}if(left!=null){Rectlroom=left.GetRoom();if(lroom.x!=-1){returnlroom;}}if(right!=null){Rectrroom=right.GetRoom();if(rroom.x!=-1){returnrroom;}}// workaround non nullable structsreturnnewRect(-1,-1,0,0);}
And now the method to create the corridor between rooms:
publicvoidCreateCorridorBetween(SubDungeonleft,SubDungeonright){Rectlroom=left.GetRoom();Rectrroom=right.GetRoom();Debug.Log("Creating corridor(s) between "+left.debugId+"("+lroom+") and "+right.debugId+" ("+rroom+")");// attach the corridor to a random point in each roomVector2lpoint=newVector2((int)Random.Range(lroom.x+1,lroom.xMax-1),(int)Random.Range(lroom.y+1,lroom.yMax-1));Vector2rpoint=newVector2((int)Random.Range(rroom.x+1,rroom.xMax-1),(int)Random.Range(rroom.y+1,rroom.yMax-1));// always be sure that left point is on the left to simplify the codeif(lpoint.x>rpoint.x){Vector2temp=lpoint;lpoint=rpoint;rpoint=temp;}intw=(int)(lpoint.x-rpoint.x);inth=(int)(lpoint.y-rpoint.y);Debug.Log("lpoint: "+lpoint+", rpoint: "+rpoint+", w: "+w+", h: "+h);// if the points are not aligned horizontallyif(w!=0){// choose at random to go horizontal then vertical or the oppositeif(Random.Range(0,1)>2){// add a corridor to the rightcorridors.Add(newRect(lpoint.x,lpoint.y,Mathf.Abs(w)+1,1));// if left point is below right point go up// otherwise go downif(h<0){corridors.Add(newRect(rpoint.x,lpoint.y,1,Mathf.Abs(h)));}else{corridors.Add(newRect(rpoint.x,lpoint.y,1,-Mathf.Abs(h)));}}else{// go up or downif(h<0){corridors.Add(newRect(lpoint.x,lpoint.y,1,Mathf.Abs(h)));}else{corridors.Add(newRect(lpoint.x,rpoint.y,1,Mathf.Abs(h)));}// then go rightcorridors.Add(newRect(lpoint.x,rpoint.y,Mathf.Abs(w)+1,1));}}else{// if the points are aligned horizontally// go up or down depending on the positionsif(h<0){corridors.Add(newRect((int)lpoint.x,(int)lpoint.y,1,Mathf.Abs(h)));}else{corridors.Add(newRect((int)rpoint.x,(int)rpoint.y,1,Mathf.Abs(h)));}}Debug.Log("Corridors: ");foreach(Rectcorridorincorridors){Debug.Log("corridor: "+corridor);}}
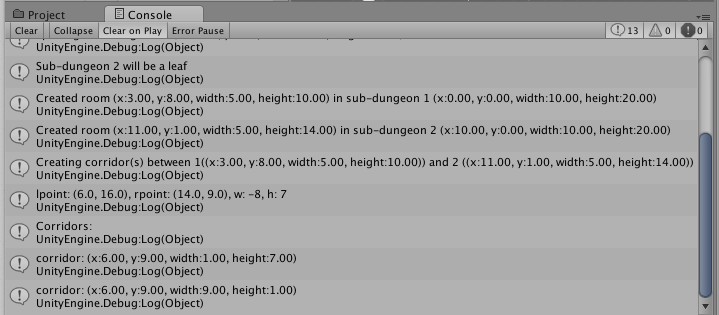
You should see the corridors being created in the console:
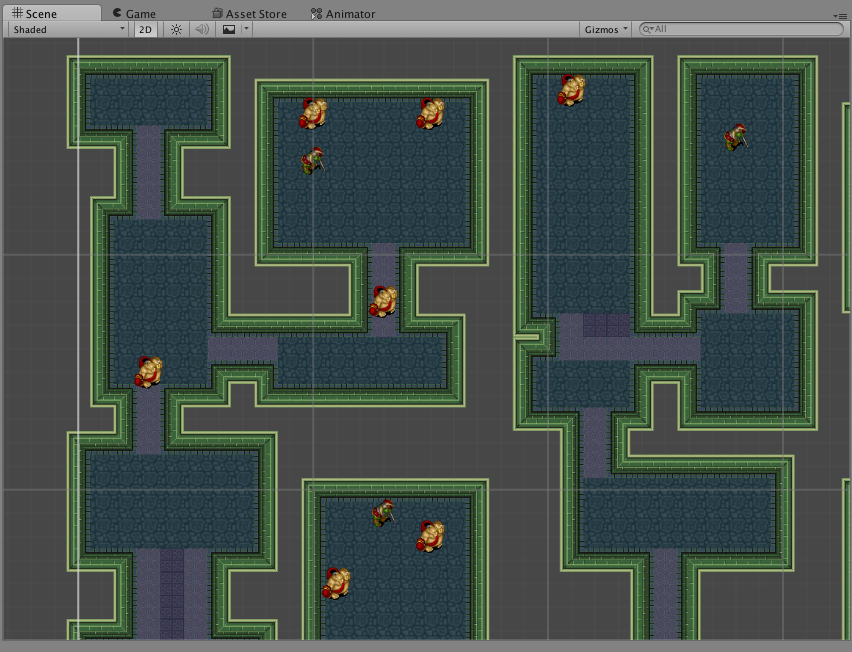
It’s hard to see visualize without the corridors being drawed but for this example it would look like this:
Draw the corridors ½: add the corridor sprite
Same as before for the rooms we’ll need a sprite , a prefab in Unity and variable to hold the prefab:
Remember to correctly set Pixels Per Unit setting:
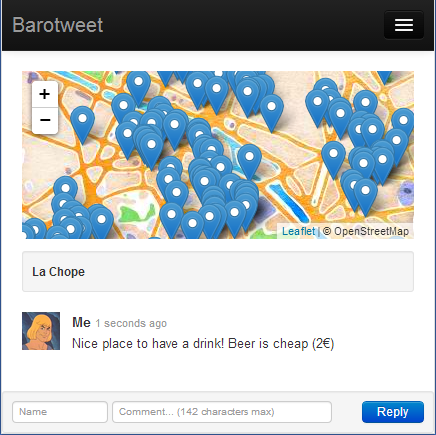
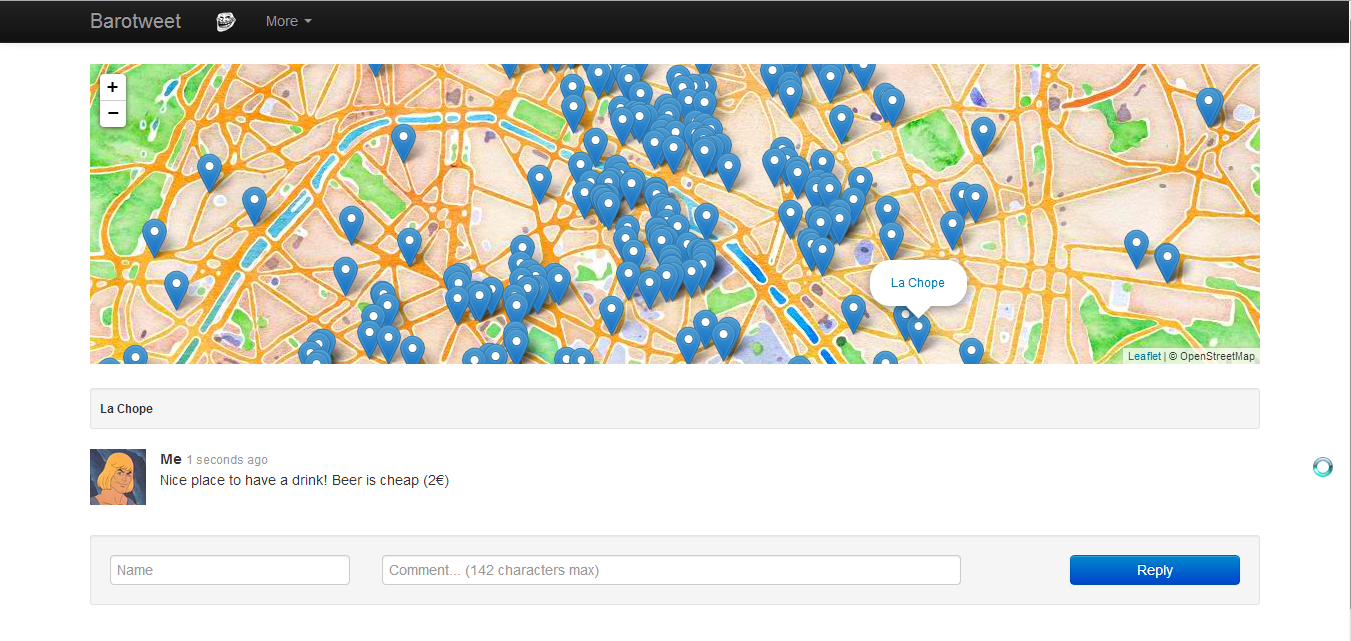
Little webapp hacked with Backbone, Leaflet, Bootstrap, Node.js and MongoDB using Responsive Design.
The landing page is a map with places around you fetched from the database (new places are eventually added through a request to OpenStreetMap).
When you click on a place you can see comments from other people and leave yours.
External libs : Leaflet (map), Firefox OS Building Blocks, JQuery and Bootstrap (for autocompletion, didn’t have time to implement mine)
Background
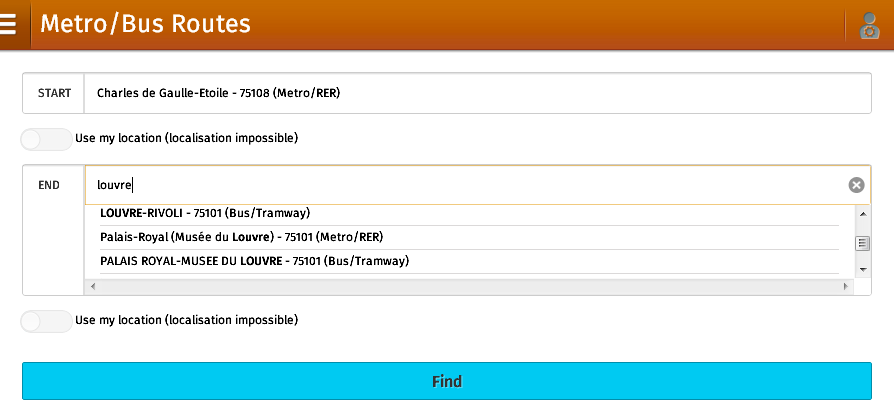
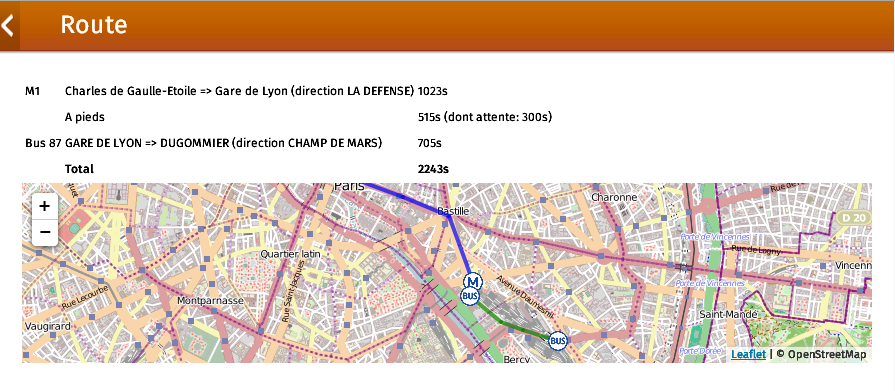
When the RATP opened their data earlier this year I thought it was a good opportunity to create an offline route planning app acrosse the whole public transportation network.
The technical challenges were :
– The full subway (metro) and bus graph, including edges with informations like durations, had to fit in less than a MB to minimize loading time
– The shortest path search had to be fast.
Conception and implementation
DATA transformation (GTFS –> JSON Graph)
The DATA provided by RATP are 1GB of flat text files with informations on every route, trips, stop times for each day of the year…
Some simplifications I made :
Collapse stations : in the original DATA, stations are duplicated for every direction (route) and every line. This would have leaded to an overly complicated graph
Average durations and wait times
The final graph contains approximatly 6000 stations (stops) and around 3 edges per stations instead of 26000 stations and up to 20 edges per station.
This is achieved with 2 scripts : the first in C to parse the file stop_times.txt (650MB, millions of entry) to create the raw edges, and the second in ruby to create the graph (JSON format).
Javascript Shortest Path with Priority Queue
The first version was a straight forward implementation of Dijkstra’s algorithm. It was too slow so I decided to use a priority queue.
I started from a binary heap implementation from the book Eloquent Javascript by Marijn Haverbeke link.
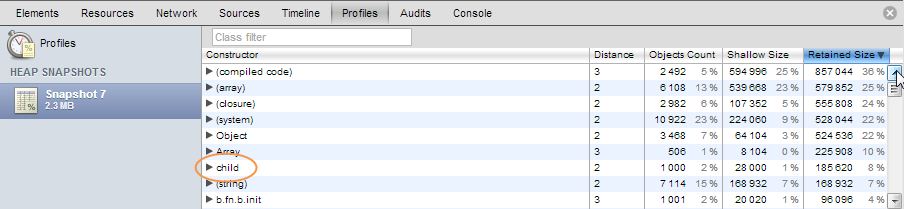
But identifying these views is not easy because models extended from Backbone Model/View have their constructor named child in the Heap Profiler.
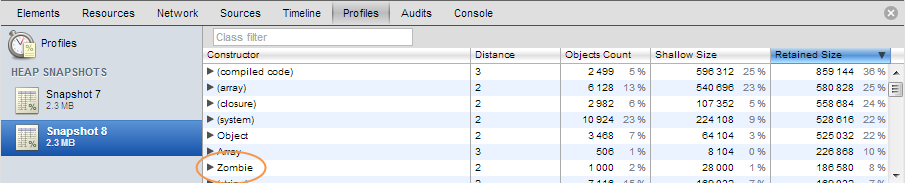
A solution to this problem would be the possibility to name the constructors. Here is a simple hack to do that :
In backbone.js, around line 1541 :
123456789
// The constructor function for the new subclass is either defined by you// (the "constructor" property in your `extend` definition), or defaulted// by us to simply call the parent's constructor.if(protoProps&&_.has(protoProps,'constructor')){child=protoProps.constructor;}else{child=function(){returnparent.apply(this,arguments);};}
Simply add a case for an optional constructor name :
123456789
if(protoProps&&_.has(protoProps,'constructor')){child=protoProps.constructor;}elseif(_.has(protoProps,'constructorName')){eval("child = function "+protoProps.constructorName+"() { return parent.apply(this, arguments); };");}else{child=function(){returnparent.apply(this,arguments);};}
Note: due to the use of ‘eval’ it is not safe in production…
Now we can add a ‘constructorName’ in our models/views.
Why do we have to worry about memory management in JS when there is a Garbage Collector ? Because memory leaks can still happen : as long as an object is referenced by another it cannot be disposed by the GC. These references are “Retaining Paths” in the Heap Profiler.
A common source of these problems are event binding : events are references, which prevent object to be destroyed after they are removed from the DOM. This can happen with Backbone Views.
Example
Here is a simple example (using the Backbone global object as an event mediator) :
Nothing should appear in the console because every view is removed after its creation. As we can see this is not the case : the views are still catching greetingEvent and displaying a message.
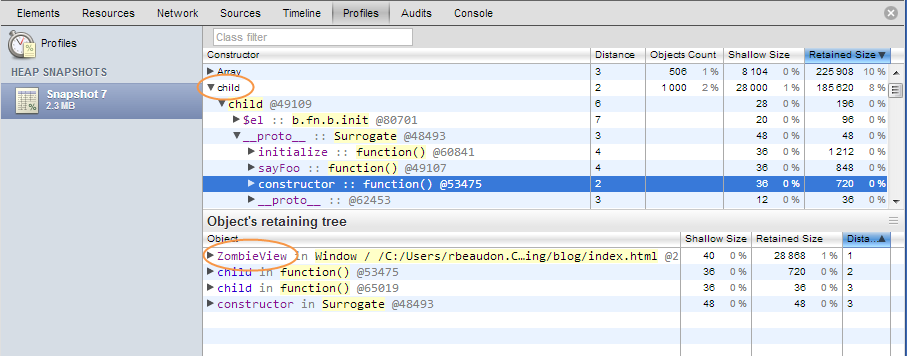
A heap snapshot confirm that all the ZombieViews are still here (extended Backbone models have their constructor named child, see this post for a solution).
Why the views aren’t removed ?
Troobleshoot
If we take a heap snapshot we can see that the greetingEvent is in the retaining path of the views. This path prevent the GC to dispose the object.
Let’s modify the code with a call to listenTo instead of Backbone.on. With listenTo models can keep track of events binded so they can be unbinded by the remove method and thus allow the GC to dispose the attached views.
//...dog_initcanvas();dog_initsound();dog_events();//mouse and keyboarddog_initworld();dog_setupcollisions();dog_initdraw();dog_update();//...
Collisions
1234567891011121314
//...functiondog_setupcollisions(){varlistener=newBox2D.Dynamics.b2ContactListener;listener.BeginContact=function(contact){//if the dog touch the line we add a flag//...listener.PreSolve=function(contact){//if the dog eats a bone there's no collision//...listener.PostSolve=function(contact,impulse){//if the dog touch his house//and sounds...//...
Main loop
123456789101112131415161718192021222324
//...functiondog_update(){window.requestAnimationFrame(dog_update);world.Step(1/60,//frame-rate10,//velocity iterations10//position iterations);world.ClearForces();canvas_draw();//graphics}//...functioncanvas_draw()//...//we iterate through all the bodiesfor(body=world.GetBodyList();body;body=body.GetNext()){//...//we use the User Data field to know what to drawswitch(body.GetUserData()){case'line'://...
I used Box2DWeb, a javascript port of box2d 2.1. It lacks features like rope joint but I realized it too late…
More up to date ports i didn’t try :
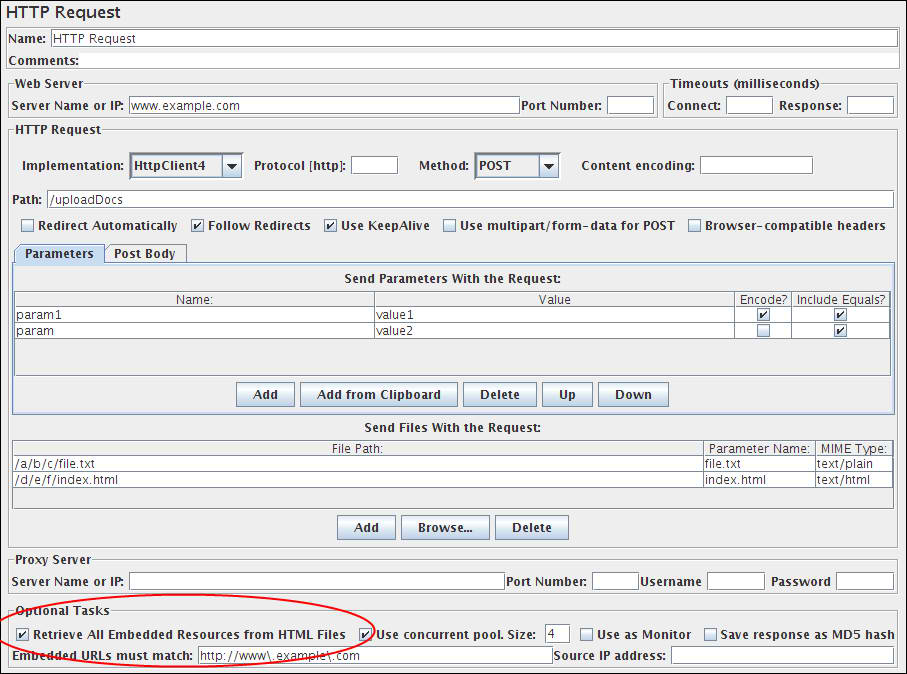
Useful when working with frames to avoid one http request per frame (I use this a lot when scripting for PeopleSoft ERP).
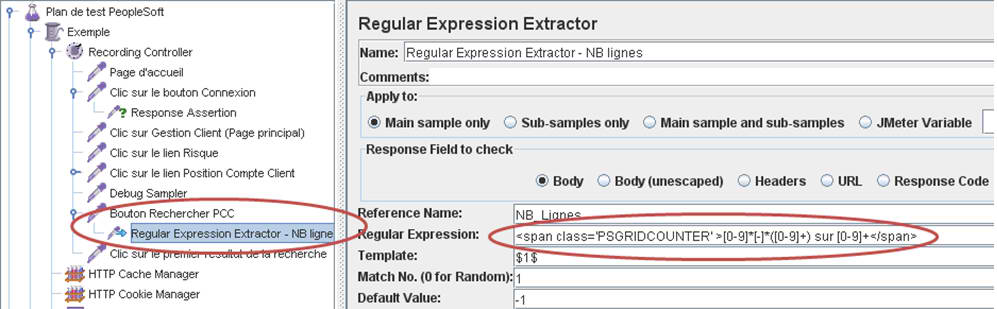
Extract a value to a variable with a regular expression
You can use a Debug Listener to adjust the regexp.
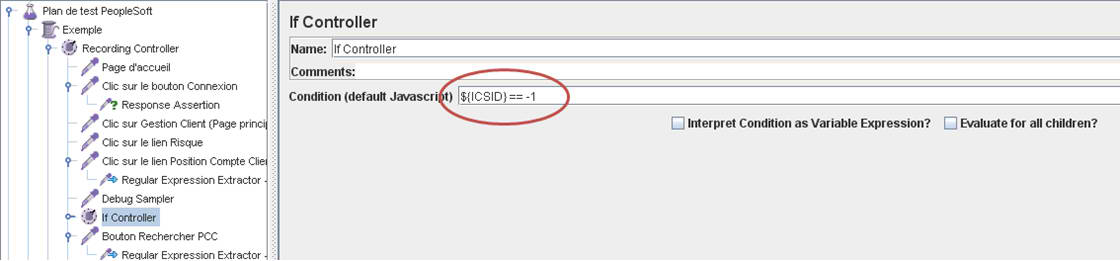
In this example (PeopleSoft) I checked “Main sample and sub-samples” because the value to be extracted is in a frame.
Test a variable
In this example I verify that the Regular Expression hereabove worked.
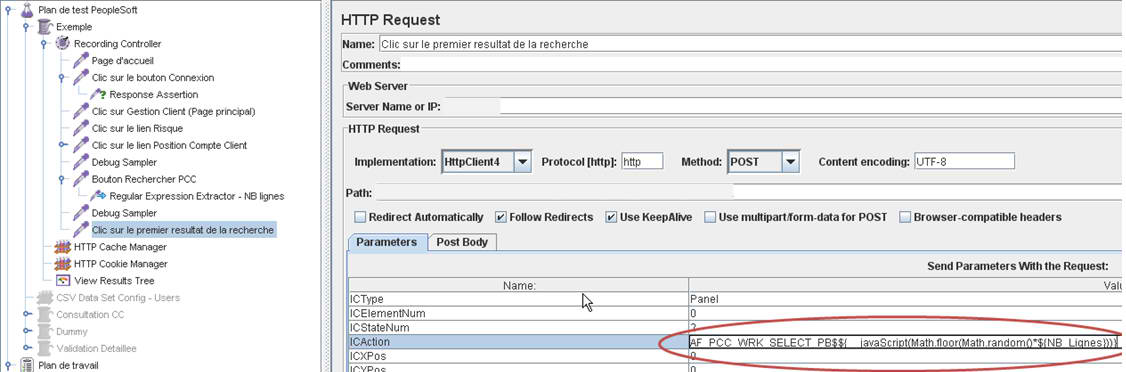
Javascript in parameters (e.g. to randomize a choice)
First we get the number of values :
Then we replace the parameter with our javascript :
fromseleniumimportwebdriverfromselenium.common.exceptionsimportNoSuchElementExceptionfromselenium.webdriver.common.keysimportKeysfromselenium.webdriver.support.uiimportWebDriverWaitimporttime,re#browser initbrowser=webdriver.Firefox()#wait template : 3 secondswait=WebDriverWait(browser,3)#goto googlebrowser.get('http://www.google.com')#verify title using python internal assertassert'Google'inbrowser.title#type cheese in the search area then submitelem=browser.find_element_by_name('q')elem.send_keys('cheese')elem.submit()#wait until we get the search results#see http://seleniumhq.org/docs/04_webdriver_advanced.html for detailswait.until(lambdad:d.title.lower().startswith('cheese'))assert'cheese'inbrowser.title#goto to translate toolsbrowser.find_element_by_link_text('Plus').click()#wait until the menu is displayed (french)#ExpectedConditions.elementsToBeClickable is not available in python#instead we can use is_displayed()#see http://selenium-python.readthedocs.org/en/latest/api.htmlwait.until(lambdad:d.find_element_by_link_text('Traduction').is_displayed())#translate from english to frenchbrowser.find_element_by_link_text('Traduction').click()assert'fromage'inbrowser.find_element_by_id('result_box').text